At Wolfmach, we love to help our customers get the very best out of every dollar they spend on their workshop, and that includes bandsaw blades and machines. But that’s not limited to just getting the right product, we know from decades of experience that users can also make great improvements through better knowledge of how to set up, maintain and use their machinery and consumables. And one the most frequently encountered issues comes from setting and maintaining the bandsaw’s guides.
In this article, we’re going to look at what a good set of guides should include, what problems they can cause when not set correctly, and most importantly, how to ensure that they are correctly aligned and maintained.
Click on the titles below to see more about each of the topics.

What does a good set of guides include, and why?
Like people, not all bandsaws are made equal, and some machines need more ‘guidance’ than others!
The purpose of the guides is to ease & control the twisting of the blade through the cutting zone so that it can be perpendicular to the material while cutting. By doing this effectively, the guides make a significant contribution to the quality of the cut and the life of the blade, and potentially protect the machine in extreme cases.
Guides are really the control freaks of your machine. Without the guides, the blade would run around, and between, the wheels flat to the rims like a track on an excavator, so the bearings are used to ‘guide’ the blade into the correct cutting position and back out of it after the cutting zone. For the blade to be aligned properly for the cut, the bearings need to be in good condition and of adequate size to do the job.
As we mentioned, not all bandsaws are the same, and generally speaking the wider the blade, the more control it requires. Also, for any given blade width, a blade of shorter length will be more difficult to twist than a longer one, again requiring more control.
From this, it’s easy to see why the bearings should straighten the blade for the cut, but they should also control how the pressure of the blade is applied to the material while making the cut, helping to maintain an even, constant cut pressure for a smooth, accurate cut. What this means is that, while bearings on the sides of the blades are vital, bearings that run on the back of the blade are equally important.
It is also important that the guides are movable along the length of the blade, to allow them to be positioned as close to the actual cut as possible. By keeping the gap between the guides as short as possible, you will minimise the tendency of the blade to twist or deflect through the cutting zone, improving cut quality and blade life.
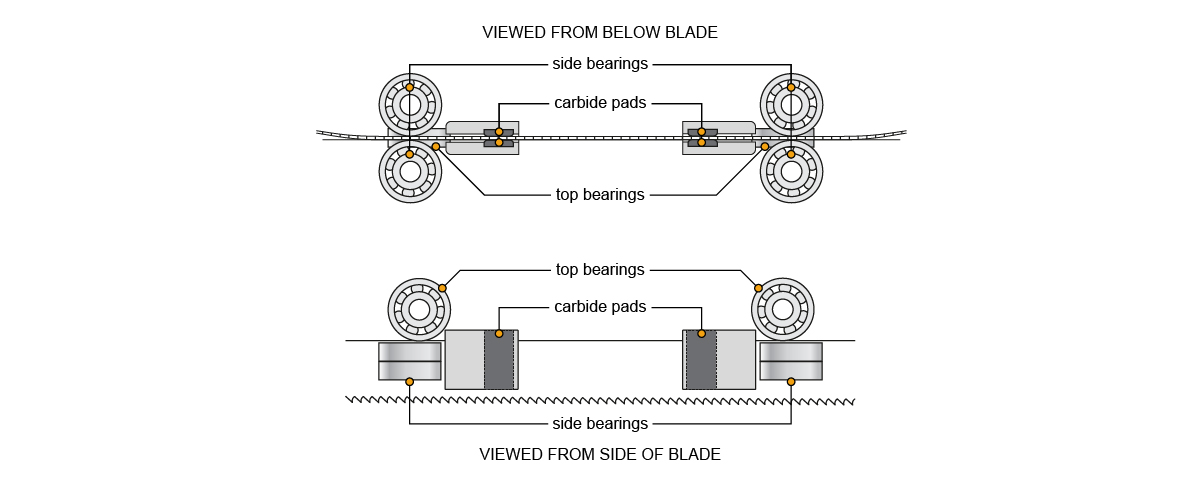
Generalised layout of a full guide set
Because the bearings are actually in contact with the blades, they should have a comprehensive set of adjustments built in to ensure that they are easily tuned and maintained, keeping the blades correctly aligned through the cut at all times. Bearings will wear over time, becoming slightly conical, and being able to adjust to compensate is vital. Top bearings also need to be set and adjusted so that they do not exert too much or too little pressure on the back of the blade.
The other important components of a guide set are the guide pads, usually carbide but occasionally made of other materials. These pads run next to the blade and are often misunderstood by users, who can believe that they play a part in straightening the blade like the bearings do. This is not their intended use on most machines, instead they are there to ‘catch’ & control any momentary deflection that may happen during the cut and so they need not be in contact with a blade except for those occasions. When they are set in contact with the blade, it is important that they do not put uneven pressure on the blade as this will cause them to wear to a taper, causing further problems down the track. There are some machines that either employ pads as supplementary straightening devices with the bearings, or have no bearings at all, but these are not usually found in commercial workshops for obvious reasons.
And because the pads actively control blade deflection when it happens, they require resetting from time to time as they wear, so a good guide set will include some method to replace pads, or to reset and adjust their position.
What problems can occur when guides are in poor condition or incorrectly set?
This is potentially a very big topic, and for reasons of brevity we will cover only the more common or serious concerns in this article.
The problems associated with guides can be roughly divided into 3 areas:
- Blade damage
- Cut quality
- Machine/guide damage
Wear lines from badly set guides
Blade damage
By far the most common, but often missed until cut quality or blade breakage becomes an issue.
When the bearings exert uneven pressure on a blade, wear lines or other indications (such as a very clean back edge with rolled ‘lips’) will be seen - provided you are looking for them. Lines along the sides of the blade can come from various causes unconnected with the guides but often indicate unequally adjusted side bearings or, in extreme cases, badly worn bearings. Whatever the cause, the blade is unlikely to be running as accurately through the cut as it should, so quality will suffer, and the damage caused to the blade itself will inevitably reduce its performance and working life.
If the guide pads are in contact with the blade, this will also show as wear lines. Where one side is affected more than the other, or the pads wear to a tapered shape, the blade is unlikely to be perpendicular through the cutting zone and crooked cuts are a typical outcome.
Cut quality
Generally related to the points above but quite often seen as the first evidence.
Where poor guide performance reduces the control over the blade in the cutting zone, the condition of the blade itself will usually be reduced and this will manifest as a drop in cut quality and accompanied by a reduction in the working life of the blade.
Many operators are, perhaps understandably, inclined to initially blame the blade itself as the cause for the issues, and it’s fair to say that sometimes the blade can be at the heart of the problem. However, while the possibility of simple blade faults cannot be ignored, our experience has proven time and time again that blade trouble is generally a diagnostic symptom of the underlying problem and that the cause is very often guide-related.
We’re always happy to replace a blade that has a genuine fault, but we’d much rather look into the evidence and help you fix an underlying cause to give you a longer-lasting, more production-friendly solution.
Machine/guide damage
While damage to the machine itself is vary rare, you can easily cost yourself money in repeated bearing and pad replacement by failing to set your guides correctly.
In extreme cases, you could find an uncontrolled blade cutting into clamps or vice parts, but it’s much more common to see avoidable early wear on the bearings and particularly the pads. Bearings can still be usable if the problem is corrected early enough, but when pads are worn and tapered it’s almost impossible to get them to correct the deflecting blade properly. And it’s a vicious cycle, where the lack of correction encourages a less controlled cut, which causes more deflection and damage to the badly-set pads, then causing even less correction…
How do I ensure my guides are set properly?
This is probably a question we’d prefer to be asked more often, as we know how much time, money and frustration is wasted on this issue.
We recommend using the following procedure as part of your regular bandsaw machine checks & maintenance.
EXPECTED TIME TO ALLOCATE: 30 MINUTES
Aim: The bearing guides should do 99% of the straightening of the blade off the wheel, with the carbide pads catching temporary deflection occurring during the cut.
These instructions are for the Sauber machines and so other brand machines have a different bearing/guide set up, so will differ slightly on how to achieve the required result.
- Take blade off machine
- Increase the carbide pad clearance: the pad on the right side of the machine is fixed, the left side can be adjusted. Loosen the large capscrew which secures the left-hand pad in place, then loosen the 2 or 3 small grubscrews to increase the clearance between the pads.
- The bearing guides are on cams: loosen the locking nuts which hold the bearing shafts in place and rotate both the cams, so the bearings are as far apart as possible. The locking nut is usually found either at the top of the guide block or underneath the bearings but can sometimes be a grubscrew through the guide block onto the bearing shaft.
- Cut and straighten a section of an old blade long enough to reach between front and rear guides and secure it in both guides by tightening it gently between the carbide pads.
- Rotate the bearings on their cams so they come to touch the piece of blade but are still loose enough to rotate by rolling with your finger (they should be just scuffing the blade) and then tighten the locking nuts.
- Loosen the adjustable carbide guide pads very slightly so clearance between the blade and pads is a slide fit, or about 0.05-0.1mm (0.3-1.0mm for the top guide, if fitted). Lock the large capscrew to secure the carbide pad in position.
- Check all nuts, grubscrews, capscrews, are retightened!

Correctly aligned guides keep the blades perpendicular to the cut
Summary:
Don’t underestimate the importance of your bandsaw’s guides. They are often the cause behind many of the blade performance and cut quality problems regularly experienced by bandsaw users yet they’re also some of the most overlooked and ignored components of your machinery.
Implementing a regular program of checks and maintenance will pay in the long run and will remove many of the production headaches often encountered when running bandsaw machines.
If you need any advice on running, maintaining or using your bandsaws, get in touch with one of our team and let them help you to Improve your Workshop Efficiency.